


By Garry Lancaster
The ZX Spectrum +3e is an enhanced version of the Sinclair ZX Spectrum +3 home computer that was produced by Amstrad in the late '80s. The enhancement consists of an updated operating system (in ROM) that fixes many of the bugs in the original ROM, and adds lots of extra commands to +3 BASIC. One of the most important features of the new ROM, however, is that it supports the use of a hard disk or compactflash card with your Speccy, allowing you to store vast amounts of quickly-accessible software.
For those unwilling or unable to add a hard disk interface to their +3, the +3e ROMs still represent a useful update, providing such features as text windowing facilities and the ability to access +3 disk files through the standard streams and channels interface.
To make your +3 (or black +2A) into a +3e, you need to install the new +3e ROM chips in your computer, and optionally add a suitable hard-disk or compactflash interface. The new ROMs are available from this site (or here on Retro Isle) as free downloads (or they can be supplied on EPROM chips if you are unable to create your own) together with information on the various supported hard disk/compactflash interfaces, including full instructions for building your own!
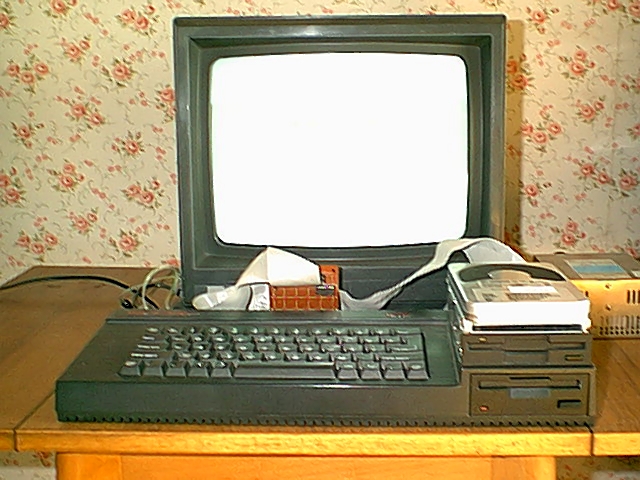
Have a look at this image to see what my original +3e setup, complete with 1Gb hard disk, looked like! I now usually use compactflash cards; either with an internal ZXCF interface (on my +3) or with an external ZXATASP interface (on my +2A).
Thanks must go to the following people, without whom this project would never have got so far:
- Cliff Lawson, for the excellent original +3 operating system
- Amstrad, for permission to modify and distribute the +3 ROMs
- Pera Putnik, who originally designed the "simple" IDE interface
- Dominic Morris, for much-needed encouragement in the early days
- John Elliott, for the wonderful ZXZVM - a great incentive to get a hard disk working!
- RamSoft, for emulating the +3e and providing a great debugger
- Mario Rodriguez for Spanish ROM translations
- Miguel Barrio Orsikowsky , for Spanish website translation
- Luis Perez, Alan Petrik, Shimi, José Leandro for efficient bug-reporting.
+3e ROMs
The current version of the +3e ROMs is v1.38. Improved versions will be posted here from time to time.
You can obtain the ROMs in one of three ways:
- Download binary images and create your own ROMs
- Send off suitable EPROMs to be burned
- Buy ready-made ROMs
Whichever you decide on, when you have your +3e ROMs, you should fit them as described in the following section.

Fitting the new ROMs
First, unscrew the case of your Spectrum. There are five screws on the bottom of the case, and two at the right-hand side on the disk drive. Remove the top by lifting at the right-hand side first, unplug the red/black cables that connect the power light to the circuit board, and take care to ensure that the keyboard cables at the left are not dislodged.
Near the edge connector at the back of the circuit board, you will see three socketed chips, one slightly larger than the others, as shown in the following diagram:
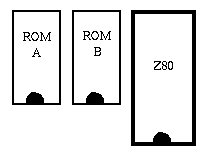
Carefully remove the two smaller chips by placing a flat-bladed screwdriver under each end in turn, and gently easing the chips out. Keep these chips safe in case you ever want to return to the original +3 ROM (note that the chip labelled 40092 is in the position marked "ROM A", and the one labelled 40093 is in the position marked "ROM B").
Now insert the replacement ROMs in the appropriate positions, taking care to ensure that they are placed the correct way round (with the semi-circular "notch" towards the front of the Spectrum) and that all the pins are properly located in the socket.
Finally, replace the cover (reconnecting the power light). Switch the Spectrum back on, and you are in possession of a ZX Spectrum +3e!
Create your own ROMs
To do this, you will need to have access to an EPROM burner. You will also need two blank 32K EPROMs, of the common 27C256 variety. Download the following file which contains versions of the ROMs for all interfaces in both English and Spanish:
The names of the ROMs contained in the zip file are encoded in the following way:
- Interface type
- The first three letters are the interface type:
- sm8 - 8-bit simple
- zxa - ZXATASP
- zxc - ZXCF & ZXCF+
- zc2 - ZXCF+2 (& ZXMATRIX)
- div - divIDE, divIDE Plus, MB02+ & MB02+IDE
- mmc - ZXMMC & ZXMMC+
- usb - ZXUSB (& ZXMATRIX)
- bad - Clon ZX-Badaloc
- yam - YAMOD8255 & PL3MEM
- pe8 - 8-bit simple Pera Putnik
- p16 - 16-bit Pera Putnik
- pcf - compact flash Pera Putnik
- Language
- The 4th and 5th letters indicate the language:
- en - English
- es - Spanish
- ROM id
- The final character of the name indicate the ROM id:
- 0/1/2/3 - 4 x 16K images of ROMs 0-3, needed by some emulators
- A/B - 2 x 32K images of ROMs A & B, used with EPROM programmers
- E - 1 x 64K image, needed by some emulators
For example, if you want the English ROMs supporting the divIDE interface, suitable for blowing with an EPROM programmer, you will need the following two files:
- diven3eA.rom
- diven3eB.rom
Send EPROMs to be burned
If you don't have the facility to create your own ROMs, I can burn them for you at no charge. Just send two 27C256 EPROMs together with a prepaid self-addressed jiffy bag for return postage to me at the following address:
Garry Lancaster 40 Hillside Park Westbury Wiltshire BA13 3QU United KingdomIf you are in Europe, please send 5 Euro cash to cover postage. Elsewhere, please contact me and we'll sort something out.
Don't forget to specify whether you want English or Spanish ROMs!
Buy ready-made ROMs
If you don't have any spare 27C256 EPROMs, I can supply and burn these for you. To do this, just send a cheque or postal order for 10GBP to the above address. Alternatively, I can accept a Paypal payment at the email address here.
If you are in Europe, the cost is 15 Euro cash. Elsewhere, please contact me for details.
Don't forget to specify whether you want English or Spanish ROMs!
Hard Disk Interfaces
When the +3e was first released back in 2000, using a hard disk with a Spectrum was a relatively new idea. There were no ready-built hard disk interfaces, but two schematics were available on the web, both designs by Pera Putnik. One of these was a very simple and easy-to-construct 8-bit interface, whilst the other was a more complex full 16-bit design. The +3e used the simple 8-bit interface (with some slight addressing modifications). This is the interface which is described here.
Several years on, and there are now a wide variety of hard disk and compactflash interfaces available for the Spectrum. Some can be bought ready-built, as kits or unpopulated PCBs, or as schematics for the enthusiast to build their own. The +3e supports all known available interfaces - if you find any that aren't supported, please contact me.
The +3e now even supports interfaces using the MMC protocol, which means really tiny interfaces can be made, accepting MMC or SD cards (typically used in digital cameras, PDAs and mobile phones etc).
Supported Interfaces
Following are are some links for the supported interfaces. Note that some of these interfaces can run other software/firmware as well as the +3e ROMs; you can generally use both the +3e ROMs and the "native" firmware, since the +3e does not interfere with any special interface facilities (such as extra RAM and ROM).
- Simple 8-bit interface
- The classic interface for the +3e! Build it yourself, as described below. Some people have built this as an internal interface that plugs into the Z80 CPU socket, with the Z80 itself "piggy-backed" on top. Steve Smith produced some PCB designs for both internal and external versions, which are archived here. José Leandro has produced some PCBs for a compactflash-based version.
- ZXATASP
- A full 16-bit hard disk interface designed and produced by Sami Vehmaa. Some versions also have a compactflash slot. This interface also contains 128K or 512K of battery-backed RAM, and can also run the ResiDOS operating system (which can use the same disks/compactflash cards and files as the +3e).
- ZXCF
- Another interface from Sami Vehmaa, for compactflash cards. This interface can be mounted internally or externally. It has 128K, 512K or 1024K of battery-backed RAM, and (like the ZXATASP) can also run the ResiDOS operating system (which can use the same disks/compactflash cards and files as the +3e).
- divIDE
- A popular interface with demo coders, the divIDE is a full 16-bit interface and can be used with hard disks and compactflash (with an adapter). It contains some RAM and ROM, which can be loaded with a variety of firmware - most notably FATware, which can load snapshots from standard FAT-formatted disks. You can share a disk between the +3e and FATware, although currently there is no easy way to move files between the two systems. Hopefully, some software for the +3e will become available shortly to remedy this situation.
- ZX-MMC
- The first SD/MMC interface for the Spectrum, from Alessandro Poppi. This fits internally, plugging into the Z80 socket and supports two card slots.
- ZX-Badaloc clone
- Also from Alessandro Poppi, this is not an interface for a standard Spectrum but a complete clone designed to fit into the rubber-key case. Amongst other goodies it has 2 SD/MMC card slots, 512K RAM, 512K ROM, variable speed (3.5MHz to 21MHz) and lots of interfaces. It can also run the ResiDOS operating system
- YAMOD.IDE8255
- Jarek Adamski's 8255-based full 16-bit interface. (NB: the +3e ROMs for this interface have not been tested; please let me know your experiences).
- PL3MEM
- Another interface from Jarek Adamski, this is identical to the YAMOD.IDE8255 but also includes 32K RAM and 64K or 128K EPROM. It can run the ZXVGS operating system, which can use the same disks as the +3e, since it has adopted the IDEDOS partitioning scheme. (NB: the +3e ROMs for this interface have not been tested; please let me know your experiences).
- Pera Putnik 8-bit interface
- The interface that started it all! This is the interface that the +3e originally used, with the exception of a few addressing differences.
- Pera Putnik 16-bit interface
- A more complex full 16-bit interface from Pera Putnik. (NB: the +3e ROMs for this interface have not been tested; please let me know your experiences).
- Pera Putnik Compactflash interface
- An exciting new interface from Pera Putnik. It's almost as easy to construct as the simple 8-bit interface, but allows the full capacity of attached compactflash cards to be used.
Setting up and sharing disks
The +3e uses its own disk partitioning scheme (called IDEDOS) to divide up your hard disk into different partitions where you can store data. If you intend only to use your hard disk/compactflash card with the +3e (or ResiDOS or ZXVGS, which also run under IDEDOS), then you can simply let the +3e format the whole thing. On the other hand, if you want to also use the drive with a PC/Mac or some other Spectrum firmware (such as FATware, if you have a divIDE interface) then it is possible to allocate just some of the disk space to the +3e.
For full details of the commands shown in the following sections, see the command reference.
Using a disk exclusively with the +3e
Until v1.28 of the +3e ROMs, this was the only option available. Once you format a disk in this way, it cannot be accessed by a PC/Mac (except with certain emulators, such as EightyOne or disk imaging utilities like drimg). This is the best option for many users, especially those with 8-bit interfaces where there is no possibility of any future software for the +3e to transfer files between +3DOS and PC (FAT) partitions.
To do this, simply use the following command:
FORMAT TO unit,maxpartition
Here, unit is the hard drive number (0 is the "master" drive, and 1 is the "slave" drive). maxpartition is one less than the maximum number of partitions that will be allowed on the drive. Although this can be as high as 65535, I'd recommend calculating the maximum number of partitions that will fit (eg on a 200MB drive you can fit 200/16=12.5 partitions; half this for an 8-bit interface) and adding a few more "spare".
For example, format a 200MB drive with a command such as:
FORMAT TO 0,31
Once you have formatted your drive, create some partitions for storing data. A swap partition may also come in useful (although no applications actually use these yet!). For example:
NEW DATA "Games",16 NEW DATA "Utils",16 NEW EXP "Swap",2
Finally, map your partitions to drives and change the default drive. If you use the ASN option, then these settings will be restored every time you turn on the +3e. For example:
MOVE "C:" IN "Games" ASN MOVE "D:" IN "Utils" ASN LOAD "C:" ASN
Sharing a disk with PC (FAT) partitions
From v1.28, the +3e supports the extended IDEDOS scheme devised by Jarek Adamski. This is already supported by ZXVGS, and will also shortly be supported by ResiDOS.
This scheme allows the PC's partition table to live in the bootsector, and moves the IDEDOS system partition on to the first sector of the second "head" of the disk. For the scheme to work, the following has to happen:
- A PC/Mac/Linux machine must first erase the disk with fdisk or a similar utility
- The first primary partition must be reserved for use with IDEDOS (by creating it with a partition type not used by PCs)
- FAT (or other) partitions may then be created in the remainder of the disk
- The +3e must format the disk, limited to the size of the first PC partition (that was reserved for it)
Once this has been accomplished, the disk can be happily used by both the +3e and PCs/FATware etc. In the near future, a utility will be made available for the +3e which can copy files between the +3DOS and FAT partitions. (Please note that this utility will only work on a +3e with a full 16-bit interface - such as divIDE, ZXCF or ZXATASP, and probably will initially only support FAT16 partitions).
How to create a shared disk
Before attempting to create a shared disk/compactflash card, you must first backup all data on the drive, since this will be destroyed by the process. You are also advised to backup all the data on your PC/Mac, since the system-level utilities that are being used are highly dangerous, and could result in you accidentally wiping the wrong disk if you are not careful! I cannot accept any responsibility for lost data if things go wrong...
First, enter the following command on your +3e, to determine the disk geometry (cylinders/heads/sectors):
CAT TAB
My SanDisk 64MB compactflash card appears as 490 cylinders, 8 heads and 32 sectors. I have decided to allocate cylinders 0-245 (approximately 32MB) to the +3e, and cylinders 246-489 to the FAT partition. The PC/Mac side usually works in logical blocks, where each block is equivalent to a sector. Therefore, the IDEDOS partition will start at block 1 (block 0 is occupied by the boot sector) and occupy (245*8*32) - 1 = 62719 blocks.
The method then used differs depending upon your operating system. Follow the appropriate link below:
Creating a shared disk: Mac OS X, Linux, Unix
The following method is for Mac OS X, but something similar should also work on Linux and other flavours of Unix. It will work with hard disks and compactflash cards.
Determine which "device" your disk is, by typing the following command both before and after connecting the disk to the Mac:
diskutil list
On my iBook, a connected compactflash card showed up as the device /dev/disk2. Now run fdisk on the device, but inserting an "r" before the "disk" part of the name. For example:
fdisk -e /dev/rdisk2
Use the following commands within fdisk to erase the drive, create a placeholder partition for IDEDOS, and create a FAT16 partition with the rest of the disk:
erase (erase the partition table) edit 1 (start editing partition 1) Partition id ('0' to disable) [0-FF]: [0] 7F (unused partition type) Do you wish to edit in CHS mode? [n] n Partition offset [0 - 125440]: [63] 1 Partition size [1 - 125439]: [125439] 62719 edit 2 (start editing partition 2) Partition id ('0' to disable) [0-FF]: [0] 0E (FAT16) Do you wish to edit in CHS mode? [n] n Partition offset [0 - 125440]: [62720] 62720 Partition size [1 - 62720]: [62720] 62720 print (display partition table) write (write partition table) quit
Mac OS X will probably pop up a dialog box at this point, asking if you want to initilize the disk. Just click "ignore" to get rid of it. Next, use diskutil to format the FAT16 partition:
diskutil list (the FAT partition should be listed, in my case as disk2s2) diskutil eraseVolume "MS-DOS" MyCF /dev/disk2s2
The FAT partition should now be formatted and will automatically mount on the desktop. Once you have ejected it, you can attach the drive to your +3e. Finally, format the IDEDOS partition using the following command, which limits the +3e to using the first 246 cylinders (0-245):
FORMAT TO 0,15,246
You can now create some partitions and map some drives, as in the first part of this document.
Creating a shared disk: Windows XP
This method is for Windows XP. Something similar will probably work under Windows 2000 and Windows NT. Only hard disks can be initialised in this way. However, you can get an IDE adapter for a compactflash card so that you can plug it in to your PC as if it was a hard disk.
Right-click on your "computer" icon and choose "Manage". Then choose "Disk Management" in the "Storage" section. Highlight the disk you want to partition. Highlight each existing partition in turn and delete them by right-clicking and choosing "delete partition".
Right-click on the unallocated space and choose "new partition". First create an extended partition; we will use this for the IDEDOS partition. Choose a size in megabytes (noting that 1MB=1048576 bytes); I chose 31MB for my IDEDOS partition. This will show up as "free space" and you should leave it alone.
Right-click on the unallocated space and again choose "new partition". Now create a primary partition, and accept the defaults to use all the remaining space. When asked to format it, choose the FAT filesystem.
Now you can attach the drive to your +3e. Finally, format the IDEDOS partition. Since we don't know exactly which cylinder the FAT partition starts on, we should make sure we underestimate the maximum cylinder that IDEDOS can use. In my case, I'll assume 50% of the disk space since I allocated slightly more than 50% to IDEDOS (ie IDEDOS could use 490/2 = 245 cylinders) and limit it to 244 cylinders, using the following command:
FORMAT TO 0,15,244
You can now create some partitions and map some drives, as in the first part of this document.
Creating a shared disk: Windows 95/98/98SE/ME
Shutdown and restart in MS-DOS mode, and then follow the instructions for DOS.
Creating a shared disk: DOS
Only hard disks can be initialised in this way. However, you can get an IDE adapter for a compactflash card so that you can plug it in to your PC as if it was a hard disk.
Start fdisk with the following command:
fdisk
(If asked if you want to enable large disk support here, say no). Select option 5 (change current fixed disk drive) to ensure you are working on the drive you want to partition. Hopefully it will be obvious from the size. Then use option 3 to delete all the existing partitions on this drive.
Once the disk is completely empty (check this with option 4, display partition information), select option 1 (create DOS partition). Then choose sub-option 2 (create extended partition); this will become your IDEDOS partition. Choose a size in megabytes (noting that fdisk treats 1MB=1048576 bytes); I chose 31MB for my IDEDOS partition. Once this has been done, you will automatically be asked to create a logical drive within the extended partition - do not do this! Instead ESCape back to the main menu.
Now choose option 1 and sub-option 1 (create primary DOS partition). Choose the default of allocating all remaining space to this drive.
Choose option 4 (display partition information), and validate that your partition table looks something like this (depending on your choice of partition sizes):
Partition Status Type Volume Label MBytes System Usage 1 EXT DOS 31 UNKNOWN 50% D: 2 PRI DOS 30 UNKNOWN 50%
Now exit fdisk and re-start your computer as advised. Finally, format the FAT partition (for Windows 95/98/98SE/ME, just right-click on the drive icon in My Computer and select "format") with the following DOS command (assuming that the new FAT partition was shown as drive D:, as above):
format /u d:
Now you can attach the drive to your +3e. Finally, format the IDEDOS partition. Since we don't know exactly which cylinder the FAT partition starts on, we should make sure we underestimate the maximum cylinder that IDEDOS can use. In my case, I'll assume 50% of the disk space (ie IDEDOS could use 490/2 =245 cylinders) and limit it to 244 cylinders, using the following command:
FORMAT TO 0,15,244
You can now create some partitions and map some drives, as in the first part of this document.
+3e Commands
All of the features provided with the +3e can be accessed using new commands added into +3 BASIC. The current commands are listed below:
- Low-level commands
- Partition management
- Drive mapping
- Streams and channels
- Miscellaneous commands
Note that all "permanent" settings stored on your hard disk can be bypassed by holding down the CAPS SHIFT key when switching on the +3e.
FORMAT TO unit,maxpart#[,cyls]
Use this command to format your hard disk so that it can be used by the +3e. Once you have done this, you can use the NEW commands to create some partitions. The command requires the following parameters:
- unit
- The hard disk unit to format; this is 0 for the master drive, and 1 for the slave drive.
- maxpart#
- The maximum partition number (0-65535). This limits the number of partitions you will be able to create. Choose carefully, since too few partitions and you won't be able to easily manage your hard disk; too many will slow down certain commands. It's probably sensible to work out how many partitions you can fit on your disk (16Mb is the maximum partition size) and double this number.
- cyls
- An optional parameter limiting the number of cylinders to use. If this option is specified, then the first sector will not be overwritten, allowing the disk to be shared between IDEDOS and PC partitions (or with FATware if you are using a divIDE interface). See the disk sharing section for details.
Examples
FORMAT TO 0,15
Formats the master drive with a maximum partition number of 15, for exclusive use by the +3e.
FORMAT TO 1,31,300
Formats the slave drive with a maximum partition number of 31, using only cylinders 0-299. This disk can be shared with PC/Mac/Linux machines, or with FATware on the divIDE interface.
CAT [#stream] TAB [EXP]
This command displays a listing of the drives attached to your +3e (together with the number of cylinders, heads and sectors). If the hard disk(s) have been formatted by the +3e, this will also show a list of all the partitions on the drive. As with the +3's standard CAT command, you can send the catalog to any stream (eg #3 for the printer). If a drive letter is shown next to a partition, this indicates that it has a permanent assignment, and the partition will be assigned to this letter automatically on boot.
By specifying the optional EXP keyword, you can get an expanded catalog, showing the starting and ending positions of each partitions (this is not usually useful, however!).
Examples
CAT TAB
Displays a listing of the partitions on your hard disks.
CAT #3 TAB EXP
Sends an expanded listing of the partitions on your hard disks to stream 3.
NEW DATA part$,size
Creates a new partition ready for +3DOS to use. It requires the following parameters:
- part$
- The name of the partition you want to create. Names are not case-sensitive, and can be up to 16 characters in length. You can include "0>" or "1>" immediately before the name to specify whether the partition should be created on the master (0) or slave (1) drive; if this is missing, the master drive is assumed.
- size
- The required size of the partition in megabytes, or Mb (1-16).
Examples
NEW DATA "0>Games",16
NEW DATA "My Documents",16
Creates two 16Mb partitions on the master drive, called Games and My Documents.
NEW EXP part$,size
Creates a new swap partition. Swap partitions are available for the +3e system and application programs to use as an extension to normal memory; they cannot be used for storing files or data. It is recommended that you create two swap partitions on your master drive, both of around 1-4Mb in size.
Parameters are identical to those used in the NEW DATA command.
Example
NEW EXP "swap1",4
Creates a 4Mb swap partition on the master drive.
MOVE part$ BIN
Deletes the partition specified by part$. Doing this will destroy all files that were stored on the partition!
Example
MOVE "Utilities" BIN
Deletes the partition named "Utilities" from the master drive.
MOVE part$ FOR name$
Renames the partition specified by part$ as name$. Note that the new name should not include a drive unit number, otherwise this will be included as part of the name.
Example
MOVE "1>Utilities" FOR "Utils"
Renames the partition named "Utilities" on the slave drive to "Utils".
CAT [#stream] ASN
This command displays a listing of your current drive mappings. The display shows the drive letter followed by the partition currently mapped (using 0> to denote the master drive, and 1> to denote the slave drive). Floppy drives and the RAMdisk are also shown; these are devices numbered 2> (internal floppy), 3> (external floppy) and 4> (RAMdisk).
As with the +3's standard CAT command, you can send the catalog to any stream (eg #3 for the printer).
Examples
CAT ASN
Displays a listing of your current drive mappings.
CAT #3 ASN
Sends a listing of your current drive mappings to stream 3.
MOVE drive$ IN part$ [ASN]
With this command, you map a drive letter to any (data) partition on your hard disk. You can then access the new "drive" in the same way you would with any other drive.
You can use any drive letter, A-P, provided it is not already in use, and each partition can only be mapped to one drive letter at a time. One final limitation in the current release of the ROMs, is that only two partitions can be mapped at any one time.
It is also possible to map the internal and external floppy drives, and the RAMdisk to any drive letter (provided you have unmapped them from A:/B:/M: with the MOVE...OUT command first). To do this, just use the physical device code instead of a partition name. These codes are as follows:
- 2>
- Internal floppy drive
- 3>
- External floppy drive (if you have only an internal drive, you can still use this device number, and will be asked to change disks as necessary)
- 4>
- RAMdisk (note that some applications expect to find a drive M:, so if moving the RAMdisk to a different drive it is advisable to map a hard disk partition to drive M:)
Finally, by using the ASN option, you can make this assignment permanent (ie, it will automatically be set up every time you turn the +3e on). This is only effective if you have a hard disk.
Examples
MOVE "C:" IN "Games"
Maps drive C: to the partition named "Games" on the master drive. It is now possible to use drive C: in +3 BASIC commands, such as COPY "A:*.*" TO "C:" and CAT "C:"
MOVE "D:" IN "4>" ASN
Maps drive D: to the RAMdisk, and makes this assignment permanent.
MOVE drive$ OUT [ASN]
Removes the current mapping from the drive specified, leaving the drive letter free to be assigned to any other partition. It is also possible to unmap drives A:, B: and M: in this way, so that you can map them to a hard disk partition with the MOVE...IN command. The physical floppy drives and RAMdisk can be reassigned to other drive letters if you wish.
By specifying the ASN option, you can remove any permanent assignment for this drive letter, so that it is no longer automatically set up when you turn the +3e on.
Examples
MOVE "C:" OUT
Removes the previous mapping from drive C:, which can now be mapped to a different partition if required.
MOVE "B:" OUT ASN
Unmaps drive B:, and ensures that nothing will be mapped to this letter next time you switch the +3e on.
LOAD drive$ [ASN]
SAVE drive$ [ASN]
VERIFY drive$ [ASN]
MERGE drive$ [ASN]
These commands can now be used with the ASN option, which specifies that the new default drive assignment should be made permanent (ie, it will be set every time the +3e is switched on). This is only effective if you have a hard disk.
Additionally, VERIFY and MERGE now work in the same way as the LOAD drive$ command, so that they set the current default (load) drive for +3 BASIC.
Examples
VERIFY "C:"
Sets the current default drive to C.
LOAD "E:" ASN
Sets the current default drive to E, and makes this assignment permanent.
OPEN #n, f$
The streams and channels system of the +3e has been extended, and it is now possible to open streams to channels other than the three standard ones. The stream number n should be between 0 and 15; altering streams 0-3 will change the behaviour of the system and should be used with care. For further details, please see the extended channels documentation, which also contains a demo of the window channels.
The channel name f$ can be any of the following (capitals or lower-case letters may be used):
- "K"
- The standard input channel (keyboard and lower screen). Streams 0 & 1 are normally set to this channel.
- "S"
- The standard output channel (main screen). Stream 2 is normally set to this channel.
- "P"
- The standard printer channel (serial or parallel). Stream 3 is normally set to this channel.
- "I>filename"
- This opens an input-only stream to an existing +3e file. If the filename is at least two characters long, you can omit the "I>" as this will be assumed (single-character names require the "I>" as otherwise they will be assumed to be standard channel names).
- "O>filename"
- This creates a new +3e file and opens an output-only stream to it.
- "U>filename"
- This opens an existing +3e file and opens an input/output-stream to it.
- "M>address, len"
- This opens an input/output channel to the memory area at address, length len.
- "V>x$"
- This opens an input/output channel to the variable x$ which must be a character array with a single dimension, large enough to hold everything that will be output to it/input from it.
- "W>line, col, ht, wid [, csize [, cset] ]"
- This opens an output-only channel to a text window on the screen, starting at character position (line,col), with a height of ht character rows and a width of wid characters. Optionally, a character size (csize) may be specified (3-8); this does not affect the definition details of the window, which are always specified in 8-bit wide characters. A user-supplied character set may also be specified, loaded at address cset.
Once a stream is opened, it can be used with the standard INPUT # and PRINT # commands, as well as the additional stream commands below.
NB: The INPUT # command currently does not work properly with file channels. However, you can simulate this command using the new NEXT # command below.
Examples
OPEN #4,"o>a:test.txt"
Creates a file named test.txt on drive A: and opens an output-only channel to it, connected to stream 4.
OPEN #5,"stuff"
Opens an existing file named stuff on the default drive and opens an input-only channel to it, connected to stream 5.
CLOSE #n
Closes the channel attached to stream n. If n is 0-3, then the default channel for that stream is re-attached to it. Note that the bug in the standard Spectrum has been corrected, and it is now safe to "close" streams that are already closed.
Examples
CLOSE #4
Closes the channel attached to stream 4.
RETURN #n, var
This command returns the current position of stream n and stores it in variable var. This is not supported on standard channels, which will fail with an invalid I/O device error.
Examples
RETURN #4,fpos
Stores the current fileposition for stream 4 into the variable fpos .
DIM #n, var
This command returns the extent (or size) of stream n and stores it in variable var. This is not supported on standard channels, which will fail with an invalid I/O device error.
Note that on the +3e, filesizes are always a multiple of 128 bytes.
Examples
DIM #4,fsize
Stores the size of the file attached to stream 4 into the variable fsize.
GOTO #n, m
This command sets the current position of stream n to m. This is not supported on standard channels, which will fail with an invalid I/O device error.
Examples
GOTO #4,fpos
Sets the current fileposition for stream 4 to fpos.
NEXT #n, var
This command gets the next character of input from stream n and stores it in the variable var. If used on the standard "K" channel, this is similar to the INKEY$ function, except that it always waits for the next character to become available (ie on the "K" channel, it waits for a keypress).
You can use this command to simulate the INPUT # command for file channels.
Examples
NEXT #0, x
Waits for the next character of input from stream 0 and stores it in variable x.
9000 LET a$="" 9010 NEXT #5,c 9020 IF c=13 THEN RETURN 9030 LET a$=a$+CHR$ c 9040 GO TO 9010
The above subroutine inputs a string from stream 5 and returns it in a$ .
SPECTRUM f$
This command loads a snapshot file in the popular .Z80 or .SNA format and runs it. Both 48K and 128K snapshots are supported. A small amount of the screen will be corrupted by the snapshot loading process - this is normal, and should not cause a problem unless the snapshot has code in the screen area.
Note that snapshot loading is only supported from hard disks/compactflash cards, not floppy disks. If you are using the +3e ROMs on a floppy-only system, you should instead use the snapshot loading programs on the software page.
Examples
SPECTRUM "trapdoor.z80"
Loads the "trapdoor.z80" snapshot from the default drive.
SPECTRUM "c:bounder.sna"
Loads the "bounder.sna" snapshot from drive C:.
SPECTRUM INK i [ASN]
SPECTRUM PAPER p [ASN]
SPECTRUM BRIGHT b [ASN]
SPECTRUM FLASH f [ASN]
These four commands set the colours for the +3 Editor screen, allowing you to type programs in to the colour-scheme of your choice.
Using the ASN option, makes the new +3 Editor and +3 BASIC colour scheme permanent, so that these colours will be used whenever you switch the +3e on (this is only effective if you have a hard disk).
Examples
SPECTRUM INK 4:SPECTRUM PAPER 0
Sets the +3 Editor colours to green ink on black paper.
SPECTRUM PAPER 1:SPECTRUM INK 6 ASN
Sets the +3 Editor colours to yellow ink on blue paper, and then makes these colours the default on booting the +3e, together with whatever the current +3 BASIC colours are.
SPECTRUM ATTR n [ASN]
Similarly to the previous colour commands, this sets the colours for the +3 Editor screen, but allows you to specify all attributes in one go. For ink i, paper p, bright b and flash f, the value is calculated as: n=(128*f)+(64*b)+(8*p)+i
Again, the ASN option sets both the +3 Editor and +3 BASIC colours that will be used every time the +3e is switched on.
Examples
SPECTRUM ATTR 4
Sets the +3 Editor colours to green ink on black paper.
SPECTRUM ATTR 14 ASN
Sets the +3 Editor colours to yellow ink on blue paper, making these colours (and the current +3 BASIC colours) permanent on boot.